Optimal settings for Handbrake when doing Blu-ray to 1080p (x.265)
Edit: 2020-03-18 (yyyy-mm-dd)
This tutorial creates .MKV -file with subtitles. It’s hard on hardware, so be patient. Output it great and the file size reasonable.
TL;DR: here is the template: Current version of Handbrake is 1.3.1, so here is updated version on the setting “Blu-Ray to 1080p”:
First of all you need to copy the contents of Blu-Ray -disc to hard drive. I assume you can do this, so next next is to install and open HandBrake:
Handbrake is the best tool for creating rips from DVD or Blu-Ray. However, there are plenty of settings to modify, and only few usable default presets. Default presets, ‘normal’ and ‘High Profile’, does the job, but with few tweaks one can create smaller and better quality rips. Here is how.
I’m demonstrating a way creating high quality rip from Blu-Ray (movie ‘Prometheus’). I’m using output resolution 1080p, but one can choose 720p resolution if needed. Up you can find downloadable preset to Handbrake, which is created / used here.
First you have to copy the full Blu-Ray to hard disk. Plenty of tools available, I use Redfox’s AnyDVD HD.
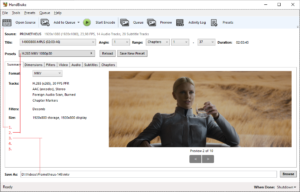
Now open up Handbrake, and load the copied Blu-Ray content using ‘Source’ (1.).
After that, let’s choose the ‘H.265 MKV 1080p30’ -preset (Presets –> Matroska –>) to work on (2.).
Choose the output file name and location (3.).

Now we are ready on the Summary -tab, let’s skip Dimensions and head to Filters. When using Blu-Ray as source, you should change the Deinterlace to Off:

To the next, which is ‘Video’.
Change the ‘Video Codec’ to “H.265 10-bit (x265)” (1.)
and the ‘Framerate (FPS)’ to “Same as source” and choose the “Constant Framerate” (2.).
Now move the RF-slider to “24” (3.).
‘Encoder Preset:’ choose “Slow” (4.).
‘Encoder Tune: “None”, ‘Encoder Profile: “Auto”, Encoder Level: “Auto”
Advanced Options: Copy “rc-lookahead=120:bframes=12:ref=6:subme=7:aq-mode=3” without the “-marks. (5.)

Let’s move to next, which is ‘Audio’. If you know what you are doing, choose the desired settings, but here we use AAC with Mixdown to Dolby Pro Logic II:

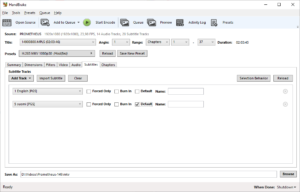
If you want to add subtitle tracks, go to the next named ‘Subtitles’, and using ‘Add track’ simpy select subtitles you want:

Now we are all done. Remember to save the preset we created here by clicking ‘Save New Preset’. Hit the ‘Start Encode’ to start the project and wait.


Hi Dear, you did a great job, thanks!
could you please repeat 720p option too, they were perfect for me, Edit 2017-06-12
Thanks
You can use this guide with 720p also, just set the output resolution 1280.
ok, thanks! kind regards!
Thanks so much!
Do you have any recommandations for AnyDVD alternatives for Mac?
I don’t have any recommendations on mac. I mean any. I hate everything that has Apple / i on it…
Checkout DVDFab.
Try MakeMKV; I’m using it on my Mac.
Can you explain what all of your advanced options are?
I would like to know that as well. I dont think I will bother with this until I know what it actually does.
Would this work with 2D andimation?
I don’t recommend it, based purely on my own testing. For 2D animation (i.e. Disney’s Lion King from 1994) just use the default presets.
What’s the compression ratio using these settings? ie.. 30G .mkv = 20G?, 10G? as I’m looking for at least 50% compression, but need to support 1080&DTS..
Also i use MakeMKV on MacBookPro and a Win10/Plex box, you can use MakeMKV free for 30-Days to rip your BD, then after that just set ur cpu clock o the year 2012, b4 u launch MakeMKV (yes, this will trip all ur AV/FW/Spyware, so b sure2 unplug form the ‘net) and it will always run. (b sure to reset ur clock & reconnect to ‘net – after ur done w/MakeMKV)